How to Draw Raven Drawing
Raven
Sort out some way to draw a mind boggling looking Raven with basic, little by little drawing rules, and video informative activity. By following the direct advances, you likewise can without a very remarkable stretch draw a brilliant Raven. Ravens are tremendous, smooth, dull birds. If you should draw this brilliant animal, follow this fundamental, step by step informative activity to draw a crow quickly and easily or visit our free spiderman coloring pages
You will not need any remarkable mechanical assemblies for this drawing project. You need simply a piece of paper and a forming execute, similar to a pen, pencil, or marker. In each step of this drawing guide, you will see new parts tended to in blue. Sketch tenderly at every turn, as you will destroy a part of your lines as you come. Add each new, blue checking to your own drawing, and you will in a little while have a complete picture of a raven. Accepting you cherished this informative activity, see furthermore the going with drawing guides: Cardinal, Hawk, and Hummingbird.
Raven for Youths – Stage 1
Begin by drawing in a medium assessed oval the upper left corner of your paper, around one fourth of the way down the page. This will be the raven’s head.
Basic Raven Drawing – Stage 2
Draw another, greater oval related with the principal oval. The ensuing oval should lean from the first towards the base right corner. It will end at the focal point of the page. This is the raven’s body.
Basic Raven Drawing – Stage 3
Interface the two ovals with two to some degree twisted lines to shape a neck.
Basic Raven Drawing – Stage 4
Sketch one long line from the middle right of the colossal oval toward the base right corner of the page. Then characterize one more limit agreed with this one, beginning at the lower part of the tremendous oval. The ensuing line should twist toward the first, but they don’t contact. This systems the bird’s tail.
Basic Raven Drawing – Stage 5
To draw the wing, make an undeniably exhilarating line beginning at the upper focus of the gigantic oval and completing at the focal point of the right tail line. Partner this to the bird’s back with another, imperceptibly twisted line.
Basic Raven Drawing – Stage 6
Then, add some plume detail. Do this by making unpleasant lines on the left 50% of the left neck line, at the lower part of the gigantic oval, and partner the two tail lines.
Straightforward Raven Drawing – Stage 7
As of now you will annihilate your standards. Dispose of the pieces of the ovals between the neck lines, inside the restrictions of the wing, or more the pointed tuft lines on the stomach.
Straightforward Raven Drawing – Stage 8
Sketch in the legs. Begin by using two twisted lines to shape the forward leg, letting the most noteworthy mark of these lines go excessively far outlining the stomach. Interface the lines at the base with a pointed line to address feathers. Use one twisted line and a thorned line to approach the most noteworthy mark of the far leg. Then, characterize two limits that start practically straight then, twist at the base to shape the front lower leg. Go over for the back lower leg.
Straightforward Raven Drawing – Stage 9
Draw the foot by beginning with a wavy line under the leg. Interface the right third of this line to the foot using another wavy line, to shape the back toe. From the toe, characterize one short straight limit and one twisted line in a very nearly three-sided shape. This is the hook, or paw. Loosen up a twisted line aside from the front of the leg. This will approach the middle toe. Characterize another twisted limit from the leg, related with the past line at 66% its length. Draw a third equivalent, twisted line under the first, fairly longer than the second. Draw a twisted triangle close to the completion of the nearest and focus toes. Interface the paw of the middle toe to the midpoint of the nearer snare with a short twisted line.
Straightforward Raven Drawing – Stage 10
From the back leg, characterize a twisted limit with a twisted triangle at its tip. Interface the triangle to the most noteworthy place of the other foot with a touch of line. Characterize another twisted limit and triangle on top of this one for the farthest toe. For the back toe, draw a little dull triangle projecting from behind the front lower leg. Structure the snare from another little triangle.
Basic Raven Drawing – Stage 11
To draw the mouth, use three twisted lines loosening up in light of what was the little oval. The lines should join in a point. Interface the right 50% of the top and focus lines with a straight line that turns distinctly at the base.
Basic Raven Drawing – Stage 12
Erase the straight line of the bill and the twisted line crossing the upper front leg.
Straightforward Raven Drawing – Stage 13
Add unpleasant lines of plume detail to the stomach, upper legs, shoulder, face, and nose. Surface the lower legs with minimal level lines.
Straightforward Raven Drawing – Stage 14
Use plunging twists to add feather surface to the upper wing.
Straightforward Raven Drawing – Stage 15
Continue to add bowing plume surface.
Straightforward Raven Drawing – Stage 16
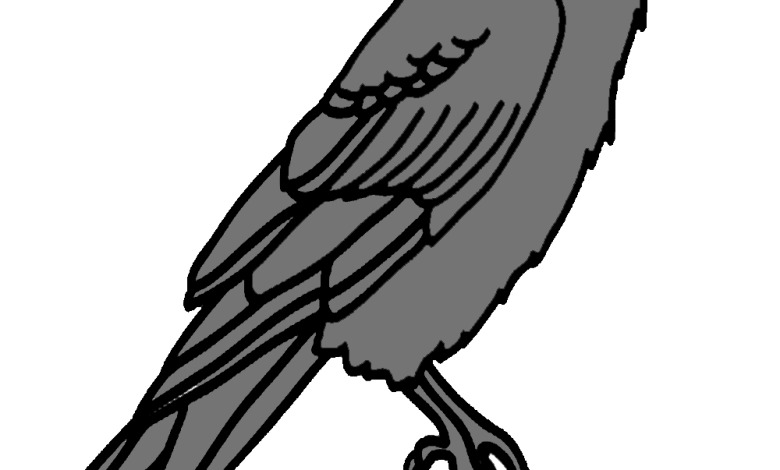
Use five twisted lines loosening up from the right of the wing to approach the crow’s flight feathers.
Straightforward Raven Drawing – Stage 17
Place three inclining, equivalent lines on the tail.
Basic Raven Drawing – Stage 18
Draw three game plans of twisted equivalent lines to surface the upper wing.
Basic Raven Drawing – Stage 19
Draw the eye especially close to the nose. Draw three circles inside each other. Hide the middle circle.
Straightforward Raven Drawing – Stage 20
Assortment your raven in shades of dull and diminish.
Also Read the fastener online